Using WebLogic Server hot deploy
- I. Introduction
- II. Deploying in a running WebLogic Server
- Deploying EJBeans from the WebLogic Console
- Deploying EJBeans with the weblogic.deploy utility
- Deploying servlets from the WebLogic Console
- Creating JDBC connection pools from the WebLogic Console
- III. Troubleshooting hot deploy
- Other related documents
- Deploying EJBs in WebLogic Server
- Deploying EJBs using DeployerTool
- deploy (utility reference)

I. Introduction
Beginning with release 4.5, WebLogic Server includes a "hot deploy" feature that allows
you to deploy, redeploy, or undeploy EJBeans while a WebLogic
Server is running. To use the hot deploy feature, you start the WebLogic
Server as described in the Tech Start Guide
Setting up and starting WebLogic Server
so that dynamic class loading is used.
After you start the WebLogic Server with the new class loader, you can
deploy EJBeans from the WebLogic Console or with the
weblogic.deploy utility.
You can also deploy servlets
and create JDBC connection pools
directly from the WebLogic Console.
For additional information, look in our Tech Support Guide
Troubleshooting your WebLogic EJB application.
Note: Dynamic class loading -- and consequently hot deploy -- is
not supported with the Microsoft SDK for Java (Jview).

II. Deploying in a running WebLogic Server
Deploying EJBeans from the WebLogic Console
The WebLogic Console allows you to deploy, undeploy, or redeploy
EJBeans from a .jar file:
- Deploying a .jar makes its EJBeans available
- Undeploying a .jar makes its EJBeans unavailable
- Redeploying a .jar refreshes the EJBeans with the EJBeans always available
Note that deploying a .jar creates a "deployment unit" in the
Server, and these units are permanent for that session of the Server.
The deployment unit can be undeployed, making the beans in it unavailable;
but the deployment unit itself is always present. It is a logical unit
which represents the EJBean interfaces loaded from its initial .jar file.
Deployments of EJBeans made through the Console
are lost when you restart the WebLogic Server. To
permanently change the deployment of an EJBean, you must edit the
weblogic.properties file.
Additional help on deploying EJBeans in the WebLogic Console is found in
the help system for the Console.
Deploying EJBeans
The top EJB object in the WebLogic Console contains two subobjects:
one for the all the deployment units, and another for all the deployed beans.
The first time you connect to a WebLogic Server, these subobjects show the
.jar files specified in the weblogic.properties file, and the EJBeans that were
deployed from them.
In the WebLogic Console, after connecting to your WebLogic Server:
- Expand the "Distributed objects" managed object by clicking on the "+" symbol on its left.
- Expand the "EJB" managed object that appears under "Distributed objects"
by clicking on the "+" symbol on its left.
- Select the "Deployment units" managed object by clicking on it. The managed object's properties box
will appear in the right-hand side of the Console.
-
Click the "Commands" tab folder in the properties box.
This folder contains the "New deployment..." button.
-
Click "New deployment...". A
dialog box appears where you can type the deployment unit name and the bean file location
to the .jar file for an EJBean you want to deploy.
The deployment unit name must be different from any
deployment unit name already existing.
The bean file location you enter must be the full pathname of an existing .jar
file.
-
Click OK.
If the .jar file is successfully deployed, managed objects will be
added under both the "Deployment units" and "Deployed beans".
A single entry will be added under "Deployment units" using the name you specified
as the deployment unit name. One entry for each bean deployed will be added under
"Deployed beans" using the bean's home interface name.
If the deployment fails, an error dialog displays a message.
Undeploying EJBeans
You can undeploy a deployment unit that has already been deployed.
Its beans will no longer be available, although the deployment unit
will remain. The beans of the deployment unit can be made available again
by using the "Deploy" command for the same
.jar file.
-
In the WebLogic Console, click the particular deployment unit managed object
listed under "Deployment units" that you want to undeploy.
-
In the Commands tab folder, click the "Undeploy" button.
A dialog will appear for you to confirm the undeployment
and advising you that if you restart the Server, any .jars
defined in the weblogic.properties file will be deployed.
-
Click OK to confirm the undeployment
Any EJBeans deployed from the .jar file are undeployed
and the EJBean managed objects will be removed from the "Deployed beans".
If the .jar file is successfully undeployed, the two
subobjects under the EJB object are updated accordingly. If
the undeployment fails, an error dialog displays a message.
Note: You can make the bean(s) in the deployment unit
available again using the
"Deploy" command.
Redeploying an EJBean
You can redeploy a deployment unit that has already been deployed.
Redeployment means that all EJB implementation classes
are refreshed in the running server. Implementations of EJB home
and remote interfaces cannot be redeployed, as described in the
Hot deploy concepts and restrictions section
of Deploying EJBs in
WebLogic Server.
Redeployment stands in contrast to an undeployment followed by a deployment, which
leaves a window in which the deployment unit is beans are unavailable.
When the deployment unit is refreshed, you must give the deployment unit a new .jar file
from which to refresh the EJBeans. All aspects of the beans in the .jar file
must be the same -- number of beans, names, interfaces -- only the code may change.
-
In the WebLogic Console, click the particular deployment unit managed object
listed under "Deployment units" that you want to redeploy.
-
In the Commands tab folder, click the "Redeploy" button.
A dialog will appear with the path of the .jar file
for that deployment unit. Edit the .jar file to the new
.jar file from which you want to refresh the bean.
- Click OK.
If the bean is successfully redeployed, the ball to the left of
the "Redeploy" button will turn blue, then green before fading to grey. If
the redeployment fails, an error dialog displays a message.
Deploying EJBeans with the weblogic.deploy utility
You can also use the
deploy command
shell utility to deploy or update an EJB on a running WebLogic Server. See
Deploying EJBs in
a running WebLogic Server (Hot Deploy) for complete instructions.
Deploying servlets from the WebLogic Console
You may hot deploy ("register") and undeploy ("unload") servlets
from the WebLogic Console without having to restart the WebLogic Server.
Note: Hot deploying or hot undeploying a servlet from the WebLogic
Console is only effective for the current server session. You must change
the servlet's registration properties in the weblogic.properties file to retain the changes when you
restart the WebLogic Server.
Registering a new servlet
- Select the HTTP ¬ Servlets ManagedObject in the
WebLogic Console, then click on the Commands tab.
- Press the 'Register new servlet' button and this dialog will appear:
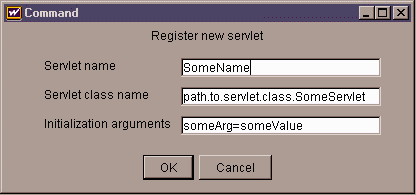
- In Servlet name, enter the 'virtual name' of the servlet.
- In Servlet class name, enter the fully-qualified name of the servlet.
The servlet class should be located in the
servlet classpath
as described in the Administrators Guide
Setting Weblogic
properties.
Note: It is possible to hot deploy servlets from the weblogic.class.path, but you will not be
able to undeploy or re-deploy them. Be carefull that your servlet classpath
does not point to any resource in your weblogic.class.path or your system classpath, as this may cause
related problems. For information on the weblogic.class.path see Starting the
WebLogic Server with the new class loader, earlier in this document.
- In Initialization arguments, you may enter one or more
name=value pairs,
separated by commas. For more information, see the Administrators Guide
Setting Weblogic properties.
- When you have completed the information, press "OK" and the servlet will
be loaded immediately.
Unloading a servlet
- Expand the HTTP ¬ Servlets ManagedObject in the
WebLogic Console to show all the registered servlets.
- Click on the servlet you'd like to unload.
- Click on the Commands tab. Press the 'Unload
servlet' button and confirm that you'd like to unload the servlet in the
dialog that opens.
- The servlet will be unloaded.
Creating JDBC connection pools from the WebLogic Console
You may hot deploy ("create"), reset and undeploy ("destroy") JDBC connection pools
from the WebLogic Console without having to restart the WebLogic Server.
Note: Hot deploying or hot undeploying a connection pool from the WebLogic
Console is only effective for the current server session. You must change
the connection pool's registration properties in the weblogic.properties file to retain the changes when you
restart the WebLogic Server.
Creating a new JDBC connection pool
- Select the Database ¬ JDBC connection pools ManagedObject in the
WebLogic Console, then click on the Commands tab.
- Press the 'Create connection pool' button.
- Complete the required information to describe the pool. For more information
on connection pool properties, see the Developers Guide
Using WebLogic JDBC: Using connection pools.
- In Connection properties,
enter any arguments as a semi-colon delimited list, as described in the Developers Guide
Using WebLogic JDBC: Creating a startup connection pool.
- Confirm the information, press "OK" and the JDBC connection pool will be created and enabled.
Resetting a connection pool
- Expand the Database ¬ JDBC connection pools ManagedObject in the
WebLogic Console to show all the registered JDBC connection pools.
- Click on the connection pool you'd like to reset.
- Click on the Commands tab. Press the 'Reset connection pool'
button.
- The connection pool will be reset.
Destroying a connection pool
- Expand the Database ¬ JDBC connection pools ManagedObject in the
WebLogic Console to show all the registered JDBC connection pools.
- Click on the connection pool you'd like to destroy.
- Click on the Commands tab. Press the 'Destroy connection pool'
button and confirm that you'd like to destroy the connection pool in the
dialog that opens. You can specify that either a
hard or soft shutdown occurs.
The default is a soft shutdown.
- The connection pool will be shutdown and destroyed.
III. Troubleshooting hot deploy
If you have problems hot deploying either an EJBean or a servlet:
- Test the deployment by entering appropriate properties in the
weblogic.properties file to make sure
that the EJBean or servlet is working correctly before attempting to hot deploy.
- Check that classpath and the WebLogic Server have been set correctly
as described in the Tech Start Guide
Setting up and starting WebLogic Server.
- Error messages from the hot deployment appear in the Server log or
command line window where the Server was started and will tell
why the Server was unable to complete the action you requested.