Installing the Microsoft-IIS (proxy) plug-in
- Installing the library
- Modifying the IIS setup to proxy to WebLogic
- Creating the iisproxy.ini file
- Proxying by file extension
- Sample .ini file
- Proxying servlets from IIS to the WebLogic Server
- Testing the installation
- Change history
Described here is how to install and configure the WebLogic plug-in to a
Microsoft Internet Information Server. The plug-in allows a smooth
integration of WebLogic's HTTP functionality into Microsoft
IIS. Using the WebLogic-to-IIS plug-in enhances an existing Microsoft
installation by providing a way to access WebLogic's servlet engine
transparently. functionality into Microsoft
IIS. Using the WebLogic-to-IIS plug-in enhances an existing Microsoft
installation by providing a way to access WebLogic's servlet engine
transparently.
The plug-in is intended for use in an environment where an IIS serves
static pages, and another part of the document tree (dynamic pages
best generated by HTTP Servlets) is delegated to a WebLogic Server
operating in a different process, possibly on a different host. To
the end user -- the browser -- the HTTP requests delegated to WebLogic
still appear to be coming from the same source; WebLogic on the back-end
is invisible. The HTTP-tunneling facility of the WebLogic client-server
protocol may also operate through the plug-in, providing access to all
WebLogic services, not only HTTP servlets.
WebLogic ISAPI is available for IIS version 4.0 running on a
Microsoft NT 4.0 or Microsoft NT Server 4.0.


Installing the library
WebLogic ISAPI is distributed as the dynamic-link library "iisproxy.dll"
for NT. This file is located in the weblogic/bin directory of the distribution.
To install the ISAPI plug-in:
- Start WebLogic.
- Start IIS.
- Modify the IIS setup according to the
instructions below.
- Create an initialization file.
- Test the installation.
Modifying the IIS setup to proxy to WebLogic
You will need to configure your IIS installation for use with WebLogic
ISAPI.
- Start the IIS Internet Service Manager by selecting it in
the Microsoft IIS Start menu.
- In the left panel of the Service Manager, select
your website (the default is "Default Web Site").
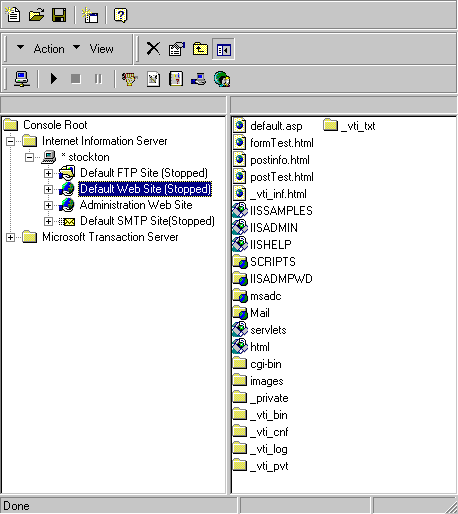
- Click the "Play" arrow in the toolbar to start.
- Open the properties for the selected website by holding the
right mouse button down over the website selection in the left panel.
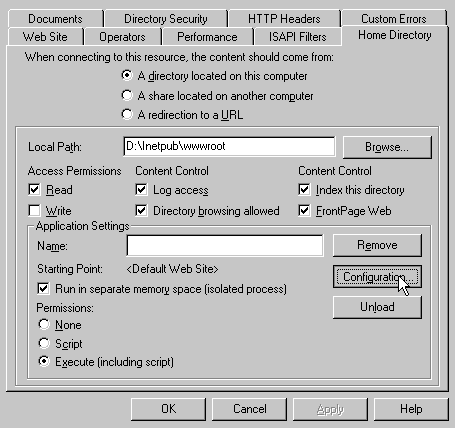
In the Properties panel, select the Home Directory tab, and click the
Configuration button in the Applications Settings section.
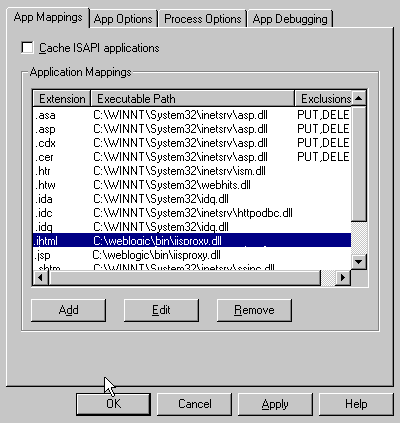
- On the App Mappings tab, click the Add button to add
file types and configure them to be proxied to WebLogic.
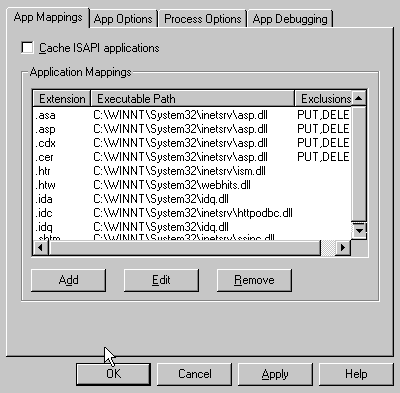
- In the dialog box, browse to find the "iisproxy.dll" file. By
default, this file is located in the WebLogic distribution in the
weblogic/bin directory. Set
the Extension to the type of file that you want to proxy to
WebLogic. Unclick the "Script engine" check box. Unclick the "Check
that file exists" check box. Set the Method exclusions to suit your
installation's security practices.

When you have finished, click the OK button to save the
configuration. Repeat this process for each file type you want to
proxy to WebLogic.
Note that, unlike the NSAPI plug-in that can be configured to serve
files based on directory structure, the ISAPI plug-in can only be
configured to serve files based on file type (file extension). In
general, you will most likely want to configure IIS to proxy files with
JHTML and JSP extensions.
When you have finished configuring file types, click the OK button
to close the Properties panel.
Creating the iisproxy.ini file
You will need to create a .ini file for the iisproxy.dll. Beginning with the 3.1.4
release of WebLogic Server, the destination location of this file is no longer
the same directory as the DLL. You should place the .ini file
in the root directory of your WebLogic installation, for
example weblogic/iisproxy.ini.
The initialization file contains name=value pairs for these variables:
- WebLogicHost=domain name
- WebLogic host to which HTTP requests should
be forwarded. For example, "WebLogicHost=localhost".
- WebLogicPort=port
- Port at which WebLogic host is listening for
WebLogic connection requests. For example, "WebLogicPort=7001".
- WebLogicCluster=cluster list
- List of WebLogic Servers that can be used in a cluster for simple load-balancing.
The cluster list is a comma-delimited list of
host:port entries, for example
"myweblogic.com:7001,yourweblogic.com:6999".
The plug-in will do simple round-robining between all available cluster
members. There is static support only. No dynamic updating
of the cluster list is performed. When a member cannot be reached it is marked
as "bad" (but is not forgotten), and another member is tried instead; after
10 skips, the member is tried again, and if successful, its status is
changed.
The plug-in will direct HTTP requests containing a cookie to the
server in the cluster that originally created the cookie.
- ConnectTimeoutSecs=seconds
- Maximum interval (in seconds) that the module should attempt to
connect to the WebLogic host. Defaults to 10 seconds, and should be
greater than ConnectRetrySecs. If ConnectTimeoutSecs expires without
a successful connection, even after the appropriate retries (see
ConnectRetrySecs) an HTTP 503/Service Unavailable response is sent to
the client. For example, "ConnectTimeoutSecs=20".
- ConnectRetrySecs=seconds
- Interval (in seconds) that the module should sleep between
attempts to connect to the WebLogic host. Defaults to 2 seconds, and
this number should always be less than the ConnectTimeoutSecs. The
plug-in will try ConnectTimeoutSecs/ConnectRetrySecs times to connect
before returning an HTTP 503/Service Unavailable response to the
client. To never retry, set ConnectRetrySecs to equal
ConnectTimeoutSecs. For example, "ConnectRetrySecs=5".
- ErrorPage=url
- You may create your own error page that will be displayed when IIS
is unable to forward requests to WebLogic Server. Set url to
the location of your error page.
- CookieName=cname
- If you change the name of the WebLogic session cookie in the WebLogic
Server, you need to add this property to the iisproxy.ini file. The name of the WebLogic session cookie is
set in the weblogic.properties file
using the weblogic.httpd.session.cookie.name
property. For more details, see the Administrators Guide,
Setting up WebLogic as an HTTP server.
Proxying by file extension
The ISAPI module can only proxy files that correspond to the types
registered for proxying in the Internet Service Manager. If you have
registered types ".jhtml" and ".jsp" for proxying, all requests with
the extension ".jhtml" or ".jsp" will be proxied to WebLogic.
Whatever other path information you add to the URL after the server
and port is passed directly to WebLogic. For example, if you request a
file from IIS with the URL
"http://myiis.com:80/jspfiles/myfile.jsp", it will be proxied to
WebLogic with a URL such as:
http://WebLogic:7001/jspfiles/myfile.jsp
Sample .ini file
Here is a sample iisproxy.ini file. Comment lines are denoted with the
"#" (hatch) character.
# This file contains initialization name/value pairs
# for the IIS/WebLogic plug-in.
WebLogicHost=localhost
WebLogicPort=7001
WebLogicCluster=myweblogic.com:7001,yourweblogic.com:6999
ConnectTimeoutSecs=20
ConnectRetrySecs=2
Proxying servlets from IIS to the WebLogic Server
There are three additional steps you must take to proxy servlets to
the WebLogic Server:
- Register an arbitrary file type (extension) with IIS to proxy the
request to the WebLogic Server, as described above under Modifying the IIS setup to proxy to WebLogic.
- Register the servlet in the weblogic.properties file. For
example,
  weblogic.httpd.register.virtualName=
       examples.servlets.myServlet
where virtualName is the virtual name for the servlet and
examples.servlets.myServlet is the full package
name of the class file to be invoked. For more information on
registering servlets, see Registering
user-written servlets.
- Invoke your servlet with a URL formed according to this
pattern:
http://www.myserver.com/virtualName/anyfile.ext
where virtualName is
the virtual name associated with the servlet in the weblogic.properties file. and
ext
is a file type (extension) registered with IIS for proxying to the
WebLogic server. The anyfile part of the URL will be ignored in this
context.
Note:
- You must also proxy all image links called from the servlet by
registering the appropriate file types (e.g. .gif and .jpg)
with IIS.
- If the servlet being proxied has links that call other
servlets, then these links must also conform to the pattern shown
above.
Testing the installation
Once you have installed and configured the ISAPI plug-in, you
follow these steps for deployment and testing:
- Make sure WebLogic and IIS are running.
- To test the ISAPI plug-in, save a JSP file into your document
root (defaults to weblogic/myserver/public_html). Then open a browser and
set the URL to the IIS + filename.jsp as shown in this
example:
http://myii.server.com/filename.jsp
Change history
- Release 4.0.1
-
Fixed a problem with iisproxy.dll so that it uses the correct
WebLogic registry key to locate its configuration file.
- Release 4.0.0
- Added functionality for simple load-balancing. The configuration
information for both can now take an additional parameter,
"WebLogicCluster," the value of which is a comma-delimited list of
host:port entries, for example
"myweblogic.com:7001,yourweblogic.com:6999,theirweblogic.com:6001".
The plug-ins will do simple round-robining between all available
cluster members (in this release there is static support only, no
dynamic updating of the cluster list is done). When a member cannot be
reached it is marked as "bad" (but is not forgotten), and another
member is tried instead; after 10 skips, the member is tried again,
and if successful, its status is changed.
- Changed some configuration parameter names for the
NSAPI obj.conf and ISAPI iisproxy.ini files from "Tengah" to
"WebLogic". This shouldn't require any changes in your code, although
we do recommend that you update your development environment. As
always, changes are backwards compatible.
- Release 3.1.2
- First release.

|